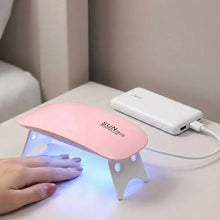
A UV LED nail lamp is an electronic curing device designed to expose UV/LED-compatible nail products to light so that they can harden.
Gel polish contains photoinitiators.
When the appropriate light reaches the gel, a chemical reaction starts that converts the liquid gel into a solid polymer coating.
This process is called curing.
A regular nail polish does not normally require a curing lamp because it dries primarily through evaporation.
Gel polish works differently.
It must receive the appropriate light exposure to cure correctly.
Modern lamps are often marketed as UV/LED lamps because they use LED technology while emitting wavelengths suitable for many UV-curable nail products.
The term "LED" describes the light source, not a completely different curing principle.
The exact compatibility still depends on the gel product and lamp.
The FDA currently lists cosmetic UV lamps as devices used to irradiate nails, among other cosmetic applications.
How Does a UV LED Nail Lamp Cure Gel Polish?
Gel polish contains ingredients that react to specific wavelengths of light.
When the gel is placed under a compatible lamp, the light activates photoinitiators inside the product.
This starts polymerization.
The gel gradually changes from a liquid or semi-liquid coating into a hardened layer.
For this reason, lamp compatibility is more important than wattage alone.
A very powerful lamp may still produce poor results if its emitted wavelengths are not suitable for the particular gel system.
Always check the curing instructions supplied by the gel manufacturer.
UV LED vs Traditional UV Nail Lamps
Traditional UV nail lamps and modern UV LED lamps differ mainly in their light sources and design.
Traditional UV lamps commonly use fluorescent bulbs.
UV LED lamps use LEDs designed to emit appropriate UV/visible wavelengths for curing compatible nail products.
LED systems can offer shorter curing times and longer-lasting light sources.
The American Academy of Dermatology notes that LED curing lights emit lower levels of UV radiation than UV curing lights and can cure gel products more quickly, reducing exposure time.
A modern UV/LED lamp can therefore be a practical option for both home users and nail professionals.
Why Use a UV LED Nail Lamp for Gel Nails?
A suitable UV LED nail lamp provides the light energy required to cure compatible gel products.
Without adequate curing, gel can remain partially uncured even when the surface appears hard.
Proper curing is important for the performance of the finished manicure.
Faster Curing
One major advantage of LED curing technology is speed.
Many gel products are designed to cure in relatively short periods under compatible LED lamps.
However, there is no universal curing time.
Different formulas require different amounts of energy.
A base coat may have a different curing requirement from a colour gel, builder gel, or top coat.
Always follow the product manufacturer's specified curing time.
Avoid assuming that a higher wattage automatically means you can cut the curing time.
The goal is adequate curing, not simply the shortest possible exposure.
Better Coverage and Consistent Results
Lamp design also affects curing performance.
A good lamp should distribute light across the nail rather than concentrating it in only a few areas.
Full-hand lamps are useful because multiple nails can be cured simultaneously.
Reflective interiors can also help direct light around the hand.
A useful lamp may include:
- Multiple LEDs.
- A spacious hand compartment.
- Automatic sensors.
- Multiple timer settings.
- A removable base.
- A clear or accessible curing area.
- Even light distribution.
Correct hand positioning is equally important.
If the fingers are placed too far forward, backward, or sideways, some areas may receive less light.
How to Choose the Best UV LED Nail Lamp
Choosing the right UV LED nail lamp starts with compatibility rather than appearance.
A lamp can have an attractive design and high wattage but still perform poorly with a particular gel system.
Check Wavelength Compatibility
Wavelength is one of the most important technical specifications.
Different gel products are formulated around specific photoinitiators and wavelength ranges.
Many modern UV/LED nail lamps are designed around commonly used curing wavelengths, but you should not assume that every lamp cures every gel.
Check:
- The gel manufacturer's recommended wavelength.
- The lamp's stated wavelength range.
- The manufacturer's curing instructions.
- Whether the product requires UV, LED, or dual-compatible curing.
If the lamp and gel are incompatible, increasing curing time is not necessarily a solution.
Consider Wattage and Curing Performance
Wattage is frequently used as a selling point for nail lamps.
You may see products advertised with numbers such as 24W, 36W, 48W, 54W or higher.
However, wattage alone does not determine curing quality.
Actual curing performance also depends on:
- Wavelength.
- LED placement.
- Optical output.
- Distance between LEDs and nails.
- Gel formulation.
- Layer thickness.
- Hand positioning.
- Lamp design.
Therefore, do not choose a lamp simply because it has the largest wattage number.
A compatible, well-designed lamp can be more useful than an unnecessarily powerful model.
Look for Timers and Motion Sensors
Timer options make curing easier.
Common settings may include:
- 30 seconds.
- 60 seconds.
- 90 seconds.
- 120 seconds.
Some lamps also include low-heat modes.
A motion sensor can automatically activate the lamp when the hand is inserted.
These features are particularly useful when performing multiple layers.
Choose the Right Lamp Size
Lamp size should match your working style.
A compact lamp can be useful for:
- Travel.
- Occasional home use.
- Single-finger curing.
- Small workspaces.
A full-size lamp is more suitable for:
- Complete manicures.
- Frequent gel applications.
- Multiple nails at once.
- Salon environments.
Before buying, check whether your hand fits comfortably inside the curing area.
How to Use a UV LED Nail Lamp Correctly
Using a nail lamp correctly is just as important as choosing the right one.
A high-quality lamp cannot compensate for poor application technique.
Prepare the Nails
Start with clean, dry nails.
Remove oils and surface residue according to the gel system's instructions.
Prepare the nail plate carefully.
Avoid aggressive filing because excessive removal of the natural nail can cause unnecessary damage.
Apply your base product according to the manufacturer's instructions.
Apply Thin Gel Layers
Thick gel layers are a common cause of curing problems.
Instead of applying one thick layer, use thin, controlled coats.
Thin layers allow the curing light to reach more of the product.
A typical gel manicure may involve:
- Base coat.
- First colour layer.
- Second colour layer.
- Top coat.
Each layer should be cured according to the product instructions.
Cure Each Layer Properly
Place the fingers correctly inside the lamp.
Keep the nails positioned beneath the LEDs.
Do not remove the hand before the recommended curing cycle is complete.
Avoid guessing the curing time based only on how the surface looks.
Some gel products can feel different even after curing.
Follow the manufacturer's recommended time and lamp combination whenever possible.
How Long Should Gel Polish Cure Under an LED Lamp?
There is no single curing time that applies to every gel product.
A typical curing cycle may be around 30–60 seconds for some LED-compatible products, but the correct time depends on the formula and lamp.
Always check the product label or manufacturer's instructions first.
Base Coat
Base coats are generally applied in a thin layer.
The manufacturer may specify a particular LED curing time.
Do not apply a thick base coat to compensate for uneven nail surfaces.
If additional structure is required, use a suitable builder or structured gel product according to its instructions.
Gel Colour
Colour gel should normally be applied in thin layers.
Darkly pigmented colours may require particular curing instructions.
Instead of applying one thick coat to achieve full opacity, use controlled layers when recommended.
Each layer should receive the complete curing cycle.
Top Coat and Builder Gel
Top coats and builder gels can have different curing requirements.
Builder gel is especially important to cure according to its specific system because the product may be applied at greater thicknesses than regular colour gel.
Never assume that the same curing time applies to every gel product.
Common UV LED Nail Lamp Problems
Many gel manicure problems are caused by incorrect application rather than a defective lamp.
Understanding the symptoms can help identify the problem.
Gel Polish Is Still Sticky
Some gel products leave a tacky inhibition layer after curing.
This does not always mean the gel has failed to cure.
However, if the gel remains soft, dents easily, moves, or wipes away, investigate the curing process.
Possible causes include:
- Incorrect lamp wavelength.
- Insufficient curing time.
- Excessively thick application.
- Old or incompatible gel.
- Incorrect hand positioning.
- Weak or damaged LEDs.
Gel Polish Wrinkles or Shrinks
Wrinkling can happen when the surface cures faster than the underlying product.
Common causes include thick coats and insufficient curing.
Try applying thinner layers.
Also confirm that the lamp is compatible with the gel.
Uneven or Incomplete Curing
Uneven curing can result from poor finger positioning.
Thumbs are particularly easy to position incorrectly.
For some lamps, curing the thumbs separately can improve light exposure.
Also check whether the lamp's LEDs are functioning correctly.
UV LED Nail Lamp Safety Tips
UV LED nail lamps are designed for short curing cycles, but they still expose the hands to UV radiation.
The American Academy of Dermatology recommends protective measures for people receiving gel manicures, including applying broad-spectrum, water-resistant SPF 30+ sunscreen to the hands before exposure or using dark, opaque fingertip-cut gloves.
Reduce Unnecessary UV Exposure
Use the lamp only for the curing time specified for the product.
Do not repeatedly run unnecessary cycles.
Avoid using a lamp for purposes other than its intended application.
It is also important to distinguish nail-curing lamps from UV-C disinfection devices.
The FDA warns that certain UV-C wands can produce unsafe radiation capable of injuring skin and eyes.
A nail curing lamp should not be treated as a disinfecting device.
Protect the Skin Around Your Hands
If you frequently receive gel manicures, consider UV-protective measures.
The AAD recommends SPF 30+ broad-spectrum, water-resistant sunscreen or dark opaque gloves with fingertips removed before gel manicures.
Avoid staring directly into the LEDs.
Follow the manufacturer's safety instructions.
If you have unusual sensitivity to light or a skin condition affected by UV exposure, ask a qualified healthcare professional before regular use.
UV LED Nail Lamp Maintenance and Cleaning
Regular maintenance helps keep your lamp working consistently.
Clean the Interior Regularly
Dust, gel residue, and product buildup can accumulate inside the lamp.
Disconnect the lamp from power before cleaning it.
Use a suitable soft cleaning method recommended by the manufacturer.
Avoid flooding electrical components with liquid.
A removable base makes cleaning easier.
Check the Power Cable and LEDs
Inspect the power cable and adapter periodically.
Look for:
- Damaged wires.
- Loose connections.
- Cracks.
- Flickering LEDs.
- Unusual heat.
- Failed LEDs.
If the lamp behaves unusually, stop using it until the problem is resolved.
Do not attempt electrical repairs unless you have the appropriate technical knowledge.
Is a UV LED Nail Lamp Worth Buying?
For anyone who regularly uses gel nail products, a suitable UV LED nail lamp can be a practical investment.
The key is choosing a lamp that matches your products.
For Home Users
Home users should prioritize:
- Compatibility.
- Simple controls.
- Reliable timer settings.
- Comfortable hand space.
- Easy cleaning.
- Automatic sensor.
- Good light coverage.
- Reasonable size.
A complicated professional lamp is not always necessary for occasional manicures.
A compact full-hand lamp with appropriate specifications may be enough.
For Professional Nail Technicians
Salon professionals may need more advanced features.
Important considerations include:
- Durable construction.
- Fast curing cycles.
- Consistent output.
- Full-hand coverage.
- Replaceable or long-life components.
- Easy cleaning.
- Reliable sensors.
- Multiple timer modes.
- Comfortable client positioning.
For professional use, reliability is often more important than cosmetic design.
Final Buying Checklist
Before purchasing a UV LED nail lamp, check these specifications:
- Gel compatibility: Does it work with your products?
- Wavelength: Does the lamp provide the required range?
- Curing instructions: Can it follow your gel manufacturer's recommended cycle?
- Light coverage: Does it illuminate the entire nail?
- Size: Can your full hand fit comfortably?
- Timer: Are useful curing intervals available?
- Sensor: Does automatic activation make the process easier?
- Cleaning: Can the interior be cleaned easily?
- Power: Is the adapter appropriate for your electrical supply?
- Safety: Are operating instructions clearly provided?
- Warranty: Does the manufacturer provide reasonable support?
The best lamp is not necessarily the one with the highest wattage.
It is the one that provides appropriate wavelength, adequate curing performance, reliable operation, good coverage, and compatibility with your gel system.
Frequently Asked Questions
Is a UV LED nail lamp better than a UV nail lamp?
For many gel users, UV LED lamps offer faster curing and convenient features.
The American Academy of Dermatology notes that LED curing lights can cure gel faster and expose users to lower levels of UV radiation than UV curing lights.
However, compatibility with the gel product remains essential.
Can every gel polish be cured with an LED nail lamp?
No.
Some gel formulas are designed around particular wavelengths or curing systems.
Check the product manufacturer's instructions before purchasing a lamp.
Is higher wattage better for a nail lamp?
Not necessarily.
Wattage is only one specification.
Wavelength, light distribution, optical output, lamp design, gel formulation, and curing distance also influence performance.
How long should gel polish stay under a UV LED lamp?
The correct curing time depends on the gel and lamp combination.
Many products use short LED curing cycles, but you should follow the manufacturer's specified time rather than applying a universal number.
Why does my gel polish remain soft after curing?
Possible causes include:
- Incorrect wavelength.
- Thick gel layers.
- Insufficient curing.
- Incorrect hand placement.
- Incompatible lamp.
- Old or improperly stored gel.
- Weak or damaged LEDs.
Check the gel manufacturer's recommended lamp and curing cycle first.
Can I use a UV LED nail lamp for builder gel?
Yes, if the builder gel is formulated for UV/LED curing and the lamp meets the required specifications.
Always follow the builder gel manufacturer's curing instructions.
Can I use a nail lamp for regular nail polish?
A curing lamp is generally unnecessary for conventional air-dry nail polish.
UV/LED lamps are primarily useful for products specifically formulated to cure under appropriate light.
Are UV LED nail lamps safe?
They are designed for controlled curing exposure, but they still involve UV radiation.
The AAD recommends reducing unnecessary exposure and using protective measures such as SPF 30+ broad-spectrum sunscreen or fingertip-cut opaque gloves for gel manicures.
Follow the lamp manufacturer's instructions and use the device only for its intended purpose.